
Here is a free AutoCAD tutorial that will show you some good basic techniques on how to insert AutoCAD electrical blocks into a lighting plan.
http://www.archblocks.com/free-autocad-tutorials/electrical-symbols-tutorial
Please send me a note if you have any questions.
Have a great day!
Kevin
Showing posts with label CAD Blocks. Show all posts
Showing posts with label CAD Blocks. Show all posts
Tuesday, August 5, 2014

Tuesday, July 22, 2014
New ArchBlocks products on the way!
Keep a close watch on the ArchBlocks.com website in the next couple months! We are adding many new AutoCAD symbol libraries and CAD design resources.
Please send us a note if you have any ideas of new CAD block libraries that we don't already offer, or send us a note if you would like to see any improvements in our existing products.
Have a great day!
Kevin
Please send us a note if you have any ideas of new CAD block libraries that we don't already offer, or send us a note if you would like to see any improvements in our existing products.
Have a great day!
Kevin
Saturday, February 12, 2011
Check Out Autodesk Homestyler Software
Create and share 2D and 3D home designs with Autodesk® Homestyler™ free online home design software. Visualize design ideas in minutes. It’s easy-to-use and accessible anytime, anywhere.
Autodesk Homestyler Facebook site;
http://www.facebook.com/homestyler
Autodesk Homestyler website;
http://www.homestyler.com/
Autodesk Homestyler Facebook site;
http://www.facebook.com/homestyler
Autodesk Homestyler website;
http://www.homestyler.com/
Friday, January 8, 2010
ArchBlocks Design Contest Winner
The first ever ArchBlocks Design Contest had many great submissions.
Remember to send in an entry for Janurary 2010!
The winner receives $100.00
December 2009 Winner
Jason Harris of Cordova Tennesee, is our December 2009 ArchBlocks Design Contest Winner. Jason used the add-on software to AutoCAD called "M-Color" to add the color fills and textures.

If you have any any great designs that you would to send in, just attach them to an email and send them to me at: Kevin@ArchBlocks.com
We accept any digital format, .dwg, .pdf, .jpg, etc.
Be sure to stop by the http://www.archblocks.com/ website to see the many new products being offered.
Everyone have a great New Year! ~Kevin
Thursday, October 23, 2008
Lighting Plan / Electrical Wiring Tutorial
Have you ever seen AutoCAD drawings where someone has added arcing lines that continue from each other, but they are not tangent? (as in having nice smooth transitions from arc to arc). Placing those nice smooth wiring lines into your electrical plans is very fast and easy! We're going to use the ARC command to place the wires. If you remember, the ARC command and it's default prompting uses the 3 point ARC option. So we start all our wiring lines with a 3 point ARC as shown below:
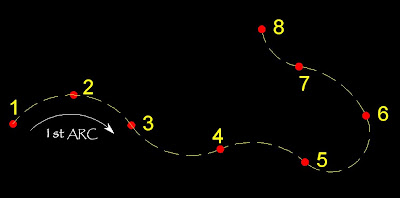 Let's practice first. Go to an open space in your drawing as shown above and enter the ARC command. I usually just type A and then spacebar, and that enters the ARC command very quickly. The prompt asks for the start point, pick point #1 anywhere in your drawing. Read the command prompt now... it asks for the second point. As you're draging from the first to the second point, it looks like a line is being drawn, ignore that and pick the second point. Once you pick the second point, what you're draging now looks like an ARC. The command prompt is now asking for the end point of the ARC, pick your 3rd point and the ARC is drawn, the command ends itself, and you have clear command prompt ready for the next step.
OK, here's the trick if you haven't done this before... if you press the spacebar or press the ENTER key, it repeats the ARC command, that's no big deal...but if you spacebar or ENTER again, it attaches the second arc to the end of your first arc!, AND the connection is TANGENT, as in a very smooth transition from one arc to the other! Now to draw the second ARC the prompting is different, look at your command prompt now... it asks only for the end point of the second arc, drag the ARC to a point that looks good and pick the end point, you're done with the second ARC. Just repeat as needed by double tapping the spacebar and picking points till you have all the arc lines that you need.
This technique is also very good for drawing curved landscape border lines!
Below is an example of running a curved wiring line from a switch to a fixture.
TIP: Remember to create a seperate layer for the wiring lines, and set a Hidden linetype to the layer. If you draw some arcs and don't see the hidden linetype, check your Ltscale setting. A good typical setting to start with in an architectural drawing is LTscale=24.
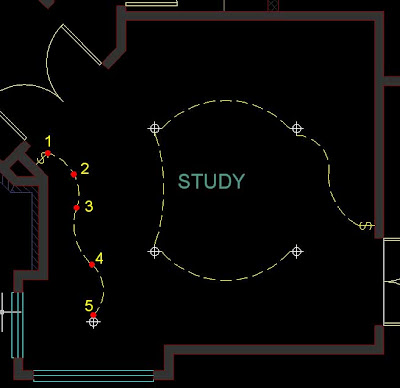 After picking point #4, the ARC command ends. Double tap the spacebar again repeating the ARC command, drag the ARC to the light fixture and pick point #5. You've just placed a perfectly smooth wiring line from switch to fixture.
TIP: If you don't like the way your wiring line looks, start over. Trying to edit the ARCs to make them look good is difficult.
Let's practice first. Go to an open space in your drawing as shown above and enter the ARC command. I usually just type A and then spacebar, and that enters the ARC command very quickly. The prompt asks for the start point, pick point #1 anywhere in your drawing. Read the command prompt now... it asks for the second point. As you're draging from the first to the second point, it looks like a line is being drawn, ignore that and pick the second point. Once you pick the second point, what you're draging now looks like an ARC. The command prompt is now asking for the end point of the ARC, pick your 3rd point and the ARC is drawn, the command ends itself, and you have clear command prompt ready for the next step.OK, here's the trick if you haven't done this before... if you press the spacebar or press the ENTER key, it repeats the ARC command, that's no big deal...but if you spacebar or ENTER again, it attaches the second arc to the end of your first arc!, AND the connection is TANGENT, as in a very smooth transition from one arc to the other! Now to draw the second ARC the prompting is different, look at your command prompt now... it asks only for the end point of the second arc, drag the ARC to a point that looks good and pick the end point, you're done with the second ARC. Just repeat as needed by double tapping the spacebar and picking points till you have all the arc lines that you need.
This technique is also very good for drawing curved landscape border lines!
Below is an example of running a curved wiring line from a switch to a fixture.
TIP: Remember to create a seperate layer for the wiring lines, and set a Hidden linetype to the layer. If you draw some arcs and don't see the hidden linetype, check your Ltscale setting. A good typical setting to start with in an architectural drawing is LTscale=24.
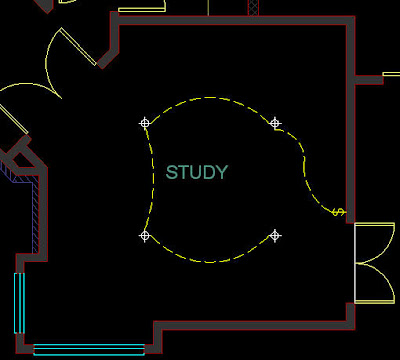
After you have placed a switch symbol, start your 3 point arc as shown above. The start point begins on the switch. Once you have completed the first ARC, double tap the space and you're right back in the ARC command ready to drag and place the second ARC. As shown above with point #4.
After picking point #4, the ARC command ends. Double tap the spacebar again repeating the ARC command, drag the ARC to the light fixture and pick point #5. You've just placed a perfectly smooth wiring line from switch to fixture.TIP: If you don't like the way your wiring line looks, start over. Trying to edit the ARCs to make them look good is difficult.
Below is an example of different ways to run wiring lines between fixtures. With a little practice, you can place them perfect the everytime! If you need a symbol library of Electrical Blocks, check out my web site address below. Don't spend any time drawing the symbols yourself, it's a massive waste of time!
http://www.archblocks.com/products.htm
If you have any questions, or comments about this AutoCAD lesson, send me a note at:
Good luck with all your projects!
~Kevin
Friday, April 25, 2008
Lighting Plan Tutorial
This is a quick and simple tutorial on placing lighting plan symbols in your AutoCAD drawings. If you haven't used the Nearest osnap setting very often, this is a great place to use it. The Nearest osnap setting lets you place a block onto a object with a perfect connection, and you get to pick exactly where you want it to go. Nearest gives you the most flexibility in accruately placing blocks.
 Next, you are prompted for Rotation. This is where Nearest works really well. Just drag your crosshairs along the wall, and pick anywhere (as long as the Nearest marker is showing). When you see your symbol rotated to where you want it, just pick, and the symbol is placed perfectly onto your wall.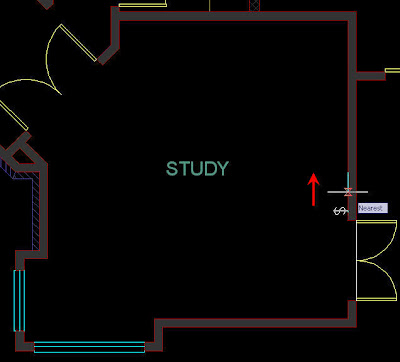
 See ya next time!
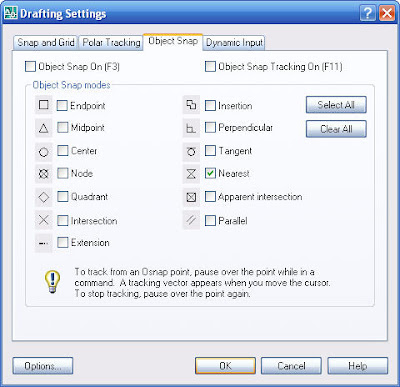
First, set the Running Osnap to Nearest, I uncheck all the other settings because they just get in the way. The quickest way to the Osnap settings is from your Status bar at the bottom of your screen. Right-Click on Osnap, then select Settings.
Once you set Nearest as your osnap it will only use that osnap, and it will be on all the time.
Let's say we want to place a single switch next to a door opening into a room. Go and find your switch block to insert. I use Design Center to manage all my blocks. I have a block library specifically for lighting plans.
If you don't have a library for lighting symbols, don't draw them all from scratch, that is a massive waste of time! I have a library that I sell, that is a great starter library for anybody needing lighting plan symbols.
Here's the URL address for the ArchBlocks.com Electrical Library:
http://www.archblocks.com/electrical_preview.htm
Below, I have located my electrical symbols in Design Center. If I want to rotate the symbol onto a wall, I need to double-click the symbol in Design Center (as shown below with the red arrow).

Once you double-click with the left mouse button, you get the Insert dialog box for inserting blocks into AutoCAD. Select OK, and you will then be prompted for two things, insertion point, and rotation.
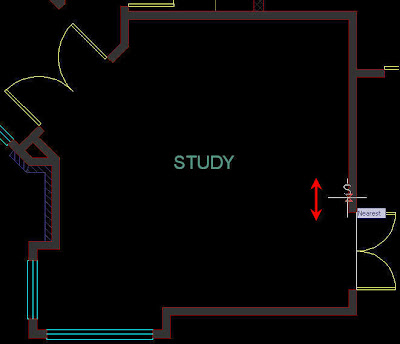
Once you pick OK, you are prompted for the insertion point. Drag your switch symbol to the location on the wall next to the door. As your crosshairs touch the wall line you will see the Nearest osnap marker appear (it is the hourglass figure - see below). You can then drag the symbol up and down the wall line to the location that you want, then pick exactly where you want the symbol to attach to the wall.
Next, you are prompted for Rotation. This is where Nearest works really well. Just drag your crosshairs along the wall, and pick anywhere (as long as the Nearest marker is showing). When you see your symbol rotated to where you want it, just pick, and the symbol is placed perfectly onto your wall. 
With Design Center, and using the Osnap setting of Nearest, you can quickly, and accurately place your lighting symbols in your drawings.
SPEED TIP: Once you Insert a symbol and rotate it into position, if you need the same symbol with the same rotation in other rooms, it's faster to Copy the symbol into the other rooms, than it is to Insert each new symbol.
Next lesson: drawing those perfect wiring arcs from your switches to the lighting fixtures.
See ya next time!Sunday, March 30, 2008
Installing AutoCAD 2009
AutoCAD 2009 shipped last week to all the users that are on subcription with Autodesk. I installed mine today and wanted to share the installation experience with you all. I've been installing AutoCAD software for over 20 years now, and you always wonder how easy and trouble free it's really going to be. My installation went very smooth, and took approximately 20 minutes. 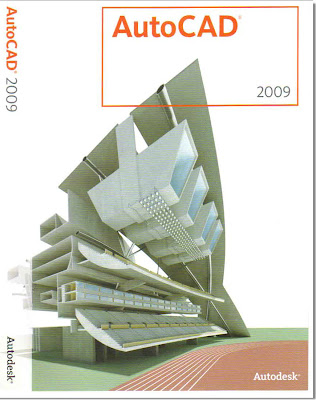 AutoCAD 2009 CD Box
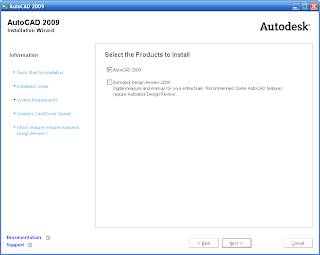
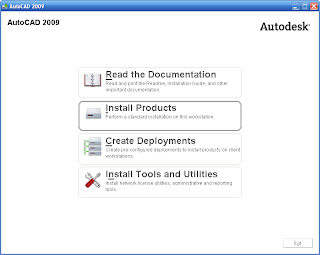 After that, you select what Products you want to install, AutoCAD 2009 was checked on by default.
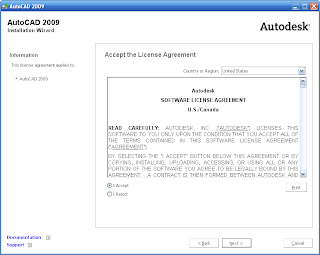
 Next you need to Accept the License Agreement.
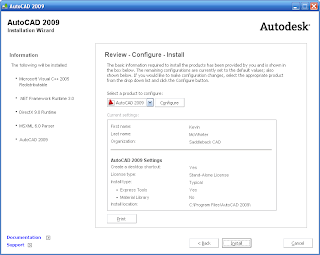
 Next you have the option to Review, Configure, or Install. After looking over the default installation settings I noticed that the installing the Materials Library was checked off. So I selected Configure, so I could check it on .
 Next you select what license type you want to install, Stand Alone, or Network.
AutoCAD 2009 CD BoxI will give a step-by-step overview below of how the installation works, and what it looks like to install AutoCAD 2009.
The first step after inserting the installation CD, is to select Install Products.
After that, you select what Products you want to install, AutoCAD 2009 was checked on by default. Next you need to Accept the License Agreement.Next you have the option to Review, Configure, or Install. After looking over the default installation settings I noticed that the installing the Materials Library was checked off. So I selected Configure, so I could check it on .Next you select what license type you want to install, Stand Alone, or Network. Then you select the Installation Type, Typical is the default.
 The next dialog states that the Configuration is Complete.
 You are almost done! The Installtion Wizard now installs everything.
 After a few minutes the Installation Complete dialog appears.
 Once you pick Finish, you can choose to Restart your computer now, or later. The installation Wizard places this shortcut on the Desktop.
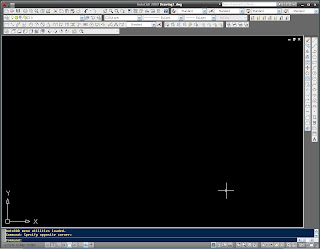
 Doubleclick the shortcut and your new AutoCAD 2009 comes to life. You will be asked if you want to migrate your settings from your older versions of AutoCAD that are on your computer. You are then asked if you would like to register now or later. I decided to register right then and it took less than a minute.
Viola! Your new AutoCAD 2009 is ready to be experienced!
Sunday, February 10, 2008
OC Metro Business Magazine Article
My new website ArchBlocks.com was featured in the OC Metro Business ~ E-Commerce section of the January 31st, 2008 edition. The OC Metro Business Magzine publishes articles on the current business events in Orange County, California.
The E-Commerce section features new, and innovative businesses that offer products over the internet.
This was an exciting event for my new website http://www.archblocks.com/ that offers upscale libraries to CAD designers.
If you would like to see the article follow the link below to:
http://www.ocmetro.com/NEW_SITE/metro013108/e_commerce.php
If you would like to view the libraries offered on the ArchBlocks.com Products page, please follow the link below:
http://www.archblocks.com/products.htm
Please stay tuned to this blog for tips and tricks, AutoCAD tutorials, and industry news.
Take care, Kevin
The E-Commerce section features new, and innovative businesses that offer products over the internet.
This was an exciting event for my new website http://www.archblocks.com/ that offers upscale libraries to CAD designers.
If you would like to see the article follow the link below to:
http://www.ocmetro.com/NEW_SITE/metro013108/e_commerce.php
If you would like to view the libraries offered on the ArchBlocks.com Products page, please follow the link below:
http://www.archblocks.com/products.htm
Please stay tuned to this blog for tips and tricks, AutoCAD tutorials, and industry news.
Take care, Kevin
Wednesday, January 16, 2008
Happy New Year from ArchBlocks.com!
Welcome!
Thank you for stopping by. This is my first post for the exciting year of 2008. Please stay tuned to this blog in the coming year. I will be posting each month tips and tricks, tutorials, and industry news, and great links that I hope everyone will find informative.
I want this blog to be a great resource for new and experienced AutoCAD users.
Thank you for stopping by. This is my first post for the exciting year of 2008. Please stay tuned to this blog in the coming year. I will be posting each month tips and tricks, tutorials, and industry news, and great links that I hope everyone will find informative.
I want this blog to be a great resource for new and experienced AutoCAD users.
Subscribe to:
Posts (Atom)


